February 18, 2011

Presenting DJ IT!!! And Bandwagon Decorating

My Nephew's Birthday is today!
This is the T-shirt I Freezer Papered for him!
His Parents call him DJ IT,
 because he has loved music since he was a whee little baby
now he is 4
a big boy
 Also this week,
I jumped on the decorating bandwagon
and stripped my hallway
(I'm sensing a theme in my house)
Here it is before:
Dullsville!
I also needed to paint
because of the nasty walls
 that have been created by my lovely children
As shown here:
I think it makes the tiny hallway look longer
and gives it a little pizazz
Now everything looks brand new!
And Fresh
and I LOVE IT!
Yesterday my mom came over,
the kiddos got her on the tramp!
I couldn't believe it!
I had to get a pic! 
This is from V-Day
We ate Hamburgers outside on the picnic table
and my little munchkins set the table! 
We had a nice time in the warm weather 
Here is Daddy with his princess 
no pics of me came out well!
Nowadays when I take pictures they look more like this:
HEHE!!!
Later Gators!!

linkparty

February 14, 2011

Ike's Valentines


I am well aware that Valentines day is full of candy,
 and this is my first Valentines day to be scared of whats coming home in my son's backpack.
 Oh I can't wait for the hyper boy I have to pick up from school later!
They are having Ice Cream Sundaes at school today, joy.
So I thought I would be that parent that gives out something a little different
no, not raisins....
I was so excited to learn how to make the Flower Bow, I made 10 more for the girls in Ike's class.
 And then I made 11 Bow Ties the for the fellas.

Adorable right? 
I didn't want to spend anymore money on the valentines,
(I bought buttons, ribbon, and Velcro, everything else was already at the house)
 so we fashioned cards out of index cards
Isaac wrote all the names, and signed his
then we sliced slits in card to hold its goodie 
here is the girl's version 
I wrote a little note for the back of the card
Then I pulled the tie through the slots 
then put dabs of hot glue around three sides of the lined sided of the card
squashed them together
shoved the tails into the pocket
dabbed more glue,
and squashed again 
I did the same for the girls, 
Here they are finished 
Wish I could be a fly in his room today 
Here is the Teacher's
He was super excited to wear the Bowtie to school
(i know he is going to kill me later on in life) 
Here is my jerseylious/ lady gaga girlfriend.
She just loves makeup! 
Good News!
I finally found my camera!
It was in that pocket behind my driver's seat!
This is the last picture on it!
So silly!
so glad to have it back!
Still holding out for my Tweezerman Tweezers
I am heart broken!
have you seen them? 


Mine are purple/pinkish
but aren't these fab?!

February 8, 2011

Cabinet Door Recycled into Coat/Purse/Key Hanger


My In-Laws just did a massive remodeling project on their house,
They redid everything,
including their kitchen
so upon finding the old cabinets on the lawn, I tore a door off and took it home
and there it sat, until the idea hit me
Nice poplar wood cabinet door, huh? 
Well this isn't how it looked when I started 
It looked more like this
Red Oil paint (They are big Husker Fans)
over an off white latex
I first started sanding, and that was taking forever
then I got a flat razorbalde and scraped off all the oil
then sanded the latex paint off 
so this is what it looks like in it's fresh state
I really tired to get all all the lax, but really didn't ant to get out the paint stripper,
 so some remains in the corners
I drilled holes for the knobs I found at Home Depot (4X$1.96) 
I picked a stain that I had from another project
(Dark Walnut)

Here it is
You can tell that I didn't get all the stain
but I thought I would go for the "worn" look
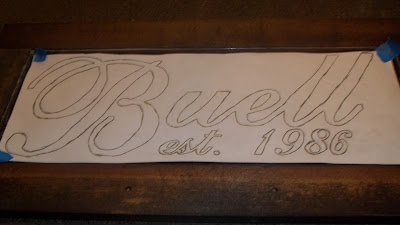
Here is my template before I use the "rubbing transfer" method
(which I basically drew everything out on the front,
traced it on the back,
then rubbed over the drawing on the front with a pencil to transfer the lead onto the wood)
After finding my lines,
I then painted,
one coat
(found the paint in the Oops stack for $.50)
I dried the paint with the hair dryer
(cuz with kids, who knows how much time I have to craft)
and then sanded it to make it look worn
I then added another layer of stain over the paint,
Then Polyed it, so just in case they put it outside
and Done!
I hope they enjoy something old coming back into their new house

(It is supposed to be a belated birthday gift to my MIL,
 but I haven't seen her since Christmas,
 so if you know her,
 don't ruin the surprise!)


------------------------------------------------------------------------------------------------------------

UPDATE: 6/18/14
Here are a couple of doors that I have completed since this project:


I've Linked up to:
http://ladybug-blessings.com/2011/02/07/handmade-tuesdays-handmade-pact-20/


linkparty 504 MainKatie's Nesting Spot border="0" href="http://tatertotsandjello.blogspot.com"  UndertheTableandDreaming


Rhinestone Shirt Refashion

I have always loved the shirts I find at the Antique Festival,
 the ones with the rhinestone designs on them,
 to bad that they always have crosses on them
and also are super expensive (like $65)
So I was excited when I found this ($20):
Well, I don't know if you can tell, but the decal is not in the middle,
also I wish I would have tried it on before buying because it looks horrid! 
I paid to much to just chunk it, so I had a brilliant idea,
Cut out the decal I like
and reattach it to a shirt that I like
(kinda like those super cool hats and dresses I see at those summer festivals) 
Here is my shirt I bought at Target ($5.46)
with a gift card,
 so it is kinda like I didn't spend any money on this project 
I tried the shirt on to see were I wanted the decal,
then I marked (with a sewing marker) the lines I wanted to stay inside of 
I used my spray adhesive to temporarily attach it to the shirt while I sewed in on 
Here it is before 
I then used the spray adhesive to attach a stabilizer to inside of the shirt
(the shirt is really soft, and I didn't want the stitches to rip through it) 
Here is the stitching up close.
I used a stitch that would stretch with the shirt
(not zigzag, but close to it) 
Also, you can tell by this picture that I didn't cut the decal out perfectly
the camo jersey will curl, and give it the worn look I wanted
I attached a heat fusible interfacing,
(so it wouldn't itch me)
and TaDa!
Now I can't decide if it needs more
and what to do with the rest of that shirt! 
I had my first order of the year,,, finally!
I was so excited, I knocked it out in one afternoon


I've Linked up to:
http://ladybug-blessings.com/2011/02/07/handmade-tuesdays-handmade-pact-20/


linkparty504 MainKatie's Nesting Spot border="0" href="http://tatertotsandjello.blogspot.com"   UndertheTableandDreaming